Archive

Archive for the ‘Random’ Category

the newark connection

July 20th, 2011 No comments

so today has been interesting to say the least. our final goodbyes went well as did our security check (besides the fact that i was selected for the xray machine and ended up opting out and got the enhanced patdown). then things went downhill.

our initial flight to newark was delayed due to heavy air traffic. we probably could have made it but then we were put into a holding pattern and landed 20 minutes before our connection.  beth grabbed mikayla and a couple bags and made a run for it with our passports and boarding passes while i got the rest of our stuff.  i ended up running through th airport with 3 backpacks and the stroller and car seat.

i was hoping our flight would be delayed but i got a call from beth saying just as she got to the gate the plane was pulling awa and there was no gate staff there. i eventually madeit (after another enhanced patdown) but tere was nothing we could do.

after a half hour on the phone witheveryone saying here was nothing they could do and going through all 3 terminals we found an airline service counter. i waited another half hour to talk to someone and they were able to book another flight the following day at 6pm. however since the delay was not mechanical they refused to comp a hotel room. als they had no idea where my bags wee or where they would go. the only thing i could do was check baggage claims the next morning at both contenital and lufthansa get my bags and then recheck them on united.

we decided to spend the night at the airport so wecould take care of things as early as possible. the best we could do i grab some chips and find a quiet corner to set up camp.

i eventually found another contential desk that told me to come back at 5 to find my luggage but then told me it had been so crazy that they doubted they would talk to an customers till 6.

so now mikayla is sleeping in her carseat and beth is curled up on the floor trying to sleep. i am staying up watching our stuff and writing emails and blog pots on our kindle (hence all the lowercase and typos.)

tomorrow we will try to get it all figured out.  looks like we are heading to frankfurt on unitedthen catching south african air to joburg. we will still make it into frica on thursday but will arrive at 11p instead of 9a. i havent talked to the sisters yt to see if they can still pick us up.

no matter what else happns i am gaurunteed this will be a memorable journey. unfortunately it will be for the wrong reasons. but at the end the day we are in good spirits and mikayla is dealing well. we will keep you all posted as we can.

Categories: Random Tags:

Where have all the posts gone?

December 28th, 2010 No comments

Generally it drives me crazy when people write posts about not writing posts.  Usually they are either apologizing for not writing, or promising more to come.  I just don’t get that.

But… that being said… I want to comment on my decrease in blogging.

Sure, I could complain that I have been too busy.  I could admit I have been too lazy.  It could be the fact that in preparing for our move I have had less time to think about blog-worthy subjects.

But, the truth of the matter is that I have found another outlet.  A couple years ago I noticed the rise of my blogging coincided with graduating seminary and ending my tenure as pastor.  Basically I took up blogging because I had lost my other outlets for writing and processing big ideas: sermon writing and papers for seminary.

Now that I have returned as the pastor of Stevenson’s Chapel in Russellville, I am once again writing 8-10 pages a week for a typical sermon.  This has not only taken up my time, it has also been my release for thinking through big picture ideas.

If you are missing your fix of Ben’s writing (HA!  Who am I kidding?), you can read my sermons online.

Amazon loses on shipping

December 6th, 2010 No comments

I ordered a book on Amazon the other day that cost $24.95.  That price put it just $0.05 away from qualifying for free shipping.  Rather than cough up the $7 in shipping costs, I searched around for something cheap that would put me over the threshold and since I know I have some electrical work to do on my car, I picked up some wire shrink wrap for $.18.  It worked out and I saved some money on shipping.

Then things got weird (and expensive for Amazon).

A day or two after placing the order, I got an email from Amazon saying they had divided my order into two shipments.  The irony made me laugh: I had only ordered the cheap tubing to save on shipping for the book, and now they were doubling their costs to get me my tubing that costs less than a quarter.

When the tubing package came in, I realized just how much Amazon lost on the deal.

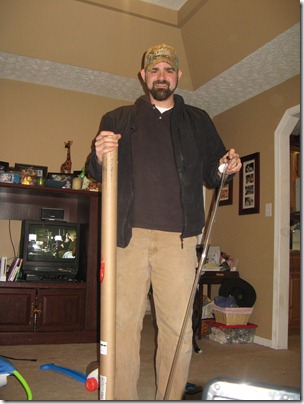
Painting and pig clip 002

Instead of shipping it in a 3"x4" bubble envelope like I expected, this tiny bit of tubing (flexible, and about the thickness of a pencil) came in a 4′ plastic tube that was then in a super reinforced cardboard mailer.  The shipping label didn’t have a price on it, but it did list the weight at 6 pounds.

Not only did Amazon lose money on shipping the original book, but they had to have thrown at least $10 down the drain to ship me my 20-cent tubing (which, as it turns out, is too narrow and I won’t even use it).

I am not complaining, but the inefficiency certainly made me chuckle.

Categories: Random Tags: , ,

Quick Swaziland Update

July 16th, 2010 No comments

Hey folks, things are rolling down here in Southern Africa. 

We spent two days in Bulembu and that was a great experience.  I know of nowhere else where people are being so intentionally about truly holistic development.  Their work encompasses infrastructure, enterprise, community care, social, political, etc.  It also helps that the area is absolutely unbelievable.  I kept being reminded of my days in northern Idaho.  We will post pictures soon.

Today we left the most mountainous region of the country and headed down to the lower hills and the capital city of Mbabane.  We visited two schools and an orphanage for abandoned babies.  Every meeting so far has been encouraging, yet completely different.  There are so many options and in some ways, we each could see how they could play out to be something amazing in the next few years.  We are trying to stay focused though knowing that our primary task must be getting a feel for things here rather than looking for that one specific option, because while things are not as fast paced as in the west, things change very quickly.

We were also able to touch base with Peter, our friend that we met while he was teaching in the States.  It was great to see a familiar face in an unfamiliar country.  We then checked in to our lodging for the night and were a bit worried when the owner had us follow her out to the “apartment” and kept driving further and further away from the city.  We finally ended up on the outskirts of town on a hill overlooking the city.  The nightlights were incredible.

We then ended the day by revisiting the orphanage from early in the day as they were hosting a going away party for two of their volunteers and invited us to join them.  We ate impala steaks and warthog roasted over the fire.  The impala in particular was out of this world.  Perhaps some of the best game I have ever eaten.

This evening we were able to video chat with Mikayla and Beth’s parents for a very short time.  Our internet is pretty flaky, but it was great for the few minutes it worked.  It has been hard being away from her – some times more than others.

Tomorrow we are visiting an AIDS clinic and a teen club for HIV-positive youth.  Then we might do a bit of the touristy things and will end our day in Hwane.  We are staying with a couple who used to work at Bulembu.  In fact, they were the first people in Swaziland we ever connected with.  It should be a great time.  Sunday should be a bit more relaxed (and the next time we will probably have internet) and then Monday begins 3 crazy days packed with meetings.

I am getting more used to the driving, but it is starting to wear on it.  Overall the Swazis are courteous drivers and rarely honk, but I have earned a few blows as I am trying to get used to things.  Thank goodness for GPS.  If I was trying to read street signs, we would all be in trouble.

We will try to do our best to keep you updated and to post pictures soon.

Categories: Random Tags:

New Credit Cards

May 20th, 2010 2 comments

In 2000 I applied for my first credit card.  It was an MBNA card with a Blackhawks logo and a $750 credit limit.  In the decade that has passed MBNA has been bought out by Bank of America, my credit limit has increased over 3,000% and Beth and I have put over $100K on that card.  (Don’t worry… we are disciplined and have never paid interest on it because we always pay it off in full.  In fact, because of our reward program, we have made close to $1000.)

Well after 10 years with MBNA / Bank of America, the time has come for us to move on.  We had been happy with our card up until the last couple years.  It probably started with the Financial Crisis as I became increasingly uneasy with how Bank of America had behaved (See this article from CNN Money and this article from Bloomberg).  Then I saw this interview with Jim Wallis on The Daily Show where he talked about “divorcing your bank” to show your displeasure with how your financial institute was morally behaving.  It made sense, but we were pretty happy with Bank of America.

That changed a few months ago when we had to challenge a charge on our credit card.  Basically we were schemed by a junk yard in Nashville.  Hilltop Auto Salvage sold us a defective engine and then despite following their return policy, they charged us over $400 in restocking fees.  I worked with the claims department at BofA from the very beginning and followed their advice.  Unfortunately it was a case of the right hand not knowing what the left hand was doing and after nearly 6 months of misinformation, bad advise, poor correspondence and contradictory reports,  our claim got completely screwed up.  We were awarded the money and then 4 months later they charged us for it again.  The worst part was that I couldn’t get a straight answer.  I followed their advice to the letter, but each person I talked with contradicted the first.  Basically I was told I was denied because I followed the process they recommended.

After that SNAFU we were ready to move on.  We did our research and realized that if we switched to Capital One we could receive more cash back and not have to worry about paying “International Fees” (something very important for us as look to make our move).  They were a pleasure to deal with and everyone I asked said they have had never had a problem with them.  Plus, I think it is pretty nifty that you can design your own card.

To no one’s surprise, my card has been customized with my initials and a carbon fiber background:

Equally unsurprising, Beth went with a picture of giraffes on her card:

We would like to thank Luca Galuzzi who generously allowed us to use his picture from Ithala Game Reserve as the background for Beth’s card.  Check out his website, he has some incredible shots: http://www.galuzzi.it/

What started as a bad taste in our mouth with Bank of America turned into a pain in the butt.  Thankfully, in the end we have ended up with what we feel is a better option…. plus we have pretty cool plastic now.

Books: Keep, Loan, Sell, Give away

May 19th, 2010 No comments

A couple weeks ago I wrote about having to whittle down my book collection.  With much difficulty, I have decided which books I am ready to get rid of.

Most of these are available

I basically have created 4 lists.  I have The Keepers that are staying with me, The Give Aways that are up for grabs, The Sellers that are being listed on Amazon and The Indefinite Loaners which are those books I want to keep, but can’t take with me.

The books that are listed as Give Aways are free to take as long as you will use them.  The represent a smorgasboard of reading: everything from real life adventure stories to Christian reference.  We can arrange for you to pick them up or ship them if you are interested.

The books that are listed under Indefinite Loaners are books that I want to keep in my collection, but probably won’t be able to use when we move to Swaziland.  I want to make sure they have a good home.  They are yours until I may need them again (probably in 5-10 years) but again, only only if you will use them.

The books I have down as For Sale are being listed on Amazon.  These are books that have been helpful to me, but still have a decent market value.  I have included the going rate for each of these.  Funds generated from these books will go towards our move to Swaziland (which is after all the reason I am selling these books).  Here is the deal though, if you as my friends and family have a use for one of these books, I would gladly pass it along to you.  But, I would ask that you consider making a donation to help pay for our move.

Sound good?

Here is a list of the lists:

I have also included an embedded version of the Sellers since those are generally the most significant:

Categories: Random Tags: , ,

Things I no longer am

April 27th, 2010 2 comments

With my daughter turning 1 tomorrow, I have been mulling over ways my life has changed recently.  It got me thinking about the things that at some point in my life served to define me, but no longer apply.  Some of these represent transitions in life, others reflect philosophical shifts, and others are simply changes (formal and informal) brought about by time.  Some of these I lament and others I am glad to have shed.

Here is a list (in no particular order) of things I no longer am:

  • A student
  • A firefighter
  • Single
  • A Saturday-morning-sleeper-inner
  • An evangelical
  • A minister
  • 165 pounds
  • 205 pounds
  • A bicycle mechanic
  • A full-time employee
  • An abstainer (I am married after all)
  • A San Fransico 49ers fan
  • A beleiver in a literal hell
  • A regular backpacker / mountain biker / rock climber
  • A person with a full head of hair
  • Anti-cell phone
  • Motivated by upward mobility
  • Childless
  • A night owl
  • Oblivious to world news
  • A critic of homosexual Christians
  • Ignorant to fine wines and spirits
  • A fiction reader
Categories: Family, Random Tags: , , ,

Work Around the Garage

March 30th, 2010 No comments

2010-03-30 Spring has sprung 045

I wouldn’t consider myself to be especially handy.  I can change my own oil, and know how to run a few power tools.  But, these are not indications of how handy I am, but rather point out just how cheap I am.  I refuse to take my car to the shop if it something I think I can figure out on my own (and after 10+ hours, with plenty of busted knuckles, I either get it figured out, or I have screwed it up so bad that I have no choice but to take it in).

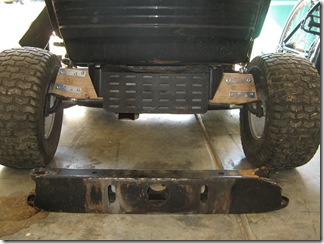
Case in point: I broke the steering arm on my riding lawn mower, which effectively meant my wheels were falling off and I could only change directions by kicking the tires while they were moving.  Did I take it to the shop to get fixed?  No.  Did I get someone to weld me a new support arm? No.  Instead, I decided to fashion a replacement out a 2×4, metal brackets, cut washers and .some furniture sliders.
2010-03-30 Spring has sprung 032

After a few adjustment, it works like a charm.  Now lets just see if I can get it to last through the summer.

Suspended Shelving and Fold-down Workbench

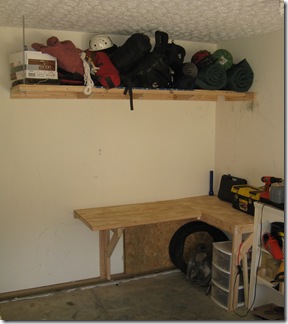
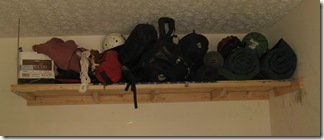
My most recent project has involved building some shelving and a work bench in the garage.  I needed to be able to get our outdoor gear out of the way, store my tools and have a workbench to complete projects on (the top of the deep freeze just wasn’t cutting it anymore.)

The first piece I completed was the suspended shelving.  I knew I wanted to build it out of plywood and 2x4s (for easy of construction and cost) and I did not want to have massive supports jutting out.  So I came up with a design that utilizes 2×4 cleats screwed to the studs and then a 3/8" threaded rod supporting one corner
2010-03-30 Spring has sprung 034

I started by marking the height I wanted the shelf and then screwing in two perpendicular 2x4s.  For my garage, it made sense to hang the shelf 48" from the ceiling.  [NOTE: I should have attached the shorter cleat first to maximize the number of studs it could screw in to.]

I then constructed the shelf itself.  I screwed 2x4s along two sides of 1/4" (2′ x 8′) plywood.  [NOTE: Be sure to leave room for the cleats you previously installed.  I forgot to do this on the short side and had to notch the cleat.]  With someone’s help, hoist the shelf up onto the cleats.  One or two strategic screws should hold it in place while you complete the project.  I waited to install the final screws until I had the rod installed to help support the weight.

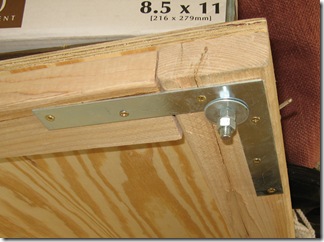
Next I installed a 90 degree bracket to help hold things together and to spread the weight distribution.  By drilling a hole through the apex and using a large washer, I was able to provide a good support for the connecting rod.
2010-03-30 Spring has sprung 043

I passed the threaded rod through this support and secured it with a large washer and two bolts.  I left roughly six inches below the bolts in case I needed to adjust things.  The rod then passed through the drywall in the ceiling where it was secured to a 2×4 passing over multiple joists.

2010-03-30 Spring has sprung 042

Besides being less obtrusive, the main advantage to using a threaded rod to support the shelf is that you can adjust it after installation.  Once the rod was secured on both ends, I was able to use the bolts to ensure everything was perfectly level.  I then cut off the excess bolt.

The only thing remaining to complete the project was to include supports.  I added 3 by tapering a 2×4 down to 1.5" and securing from the top.  These were then affixed to the cleat.  [NOTE: If I had planned ahead, I could have attached these to the cleat before I installed it and it would have resulted in a much more stable design.]

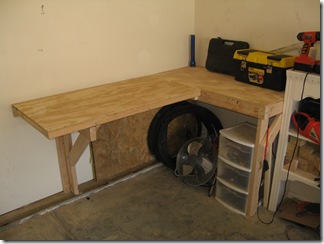
Once I had the suspended shelving complete (and the resulting clutter out of the way), I could turn my attention to building a work bench.  One thing I had to consider was the depth of my garage.  Because things can get cramped, I wanted to be able to have get the workbench out of the way if I needed to.  I decided on a two part design with a permanent section and a folding section.  I built the surface out of the other half of the plywood from the shelving project.
2010-03-30 Spring has sprung 033

The permanent section was relatively straightforward.  I built a one-legged frame out of 2×4’s and then attached it to the studs in the wall.  I used brackets to attach the support to the leg.  I then screwed the work surface onto the frame (there is a center support to help distribute weight that is built into the frame).

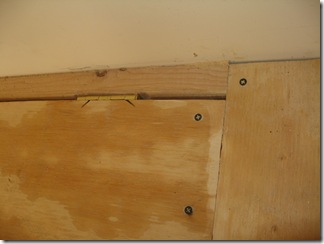
The drop-down section took a bit more thinking.  I began by attaching a 2×4 cleat flush with the permanent section of the workbench.  Then, along the furthest-most stud, I attached a perpendicular 2×4 to anchor a hinged support.

I built the drop down section out of the remaining plywood with a 2×4 frame.  This time I did not use center supports because the whole section is not designed to support a lot of weight.

I used heavy duty door hinges to support the whole apparatus.  I notched the support cleat as well as the work surface so that it could remain flush with the other work bench. 
2010-03-30 Spring has sprung 049

The hardest part was trying to align the hinges when attaching the workbench to the wall.  To do this, I attached a 2×2 on the permanent section to help support things then held the fold away bench against the cleat while trying to get it level.  I had someone else go under the bench and mark where the bottom of the hinges were.  I then took a spare hinge and used it as a guide to pre-dill the holes.  From there it was relatively easy to screw the hinges into place. 

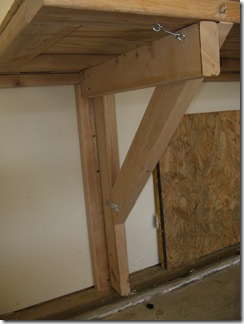
The hinges were strong enough to support the workbench temporarily, but I needed to build something more sturdy.  For that, I used the same style hinges and fashioned a simple support out of 2x4s that secured into place with a basic latch.
2010-03-30 Spring has sprung 038

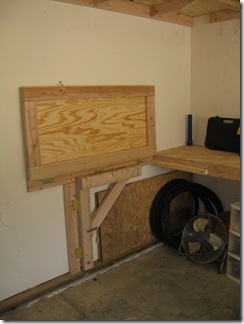
When not it use, the support and table top can fold flat against the wall.  I used another latch to secure it in the up position.
2010-03-30 Spring has sprung 039

The whole project took about $60 in materials and 10 hours in labor.  I probably could have done it much less time if my miter saw had been working and I had thought through my final design a bit more.

If I value my time at even minimum wage, I doubt I saved much.  But, just like with the home made diaper sprayer we installed, there is just something rewarding about completing a project on your own.
2010 NCAA Tournament Picks

March 17th, 2010 3 comments

Here are my NCAA Tournament picks for this year:

Categories: Events, Random Tags: , ,

Do It Yourself Diaper Sprayer

March 16th, 2010 14 comments

Beth and I have been very pleased with our decision to use cloth diapers.  Besides the washing every couple days, the only thing that really requires more effort than disposables is the need to clean the #2 off of diapers.  You can splash them around in the toilet, but most people prefer to use a diaper sprayer.

You can purchase these from a variety of places (see here, here and here).  These generally run about $40.  However, if you are up for it, you can build your own homemade diaper sprayer for $25-30 in less than 30 minutes. Below you will find instructions and a parts list for the method I have used for two installs.

Before you begin, you need to know a bit about basic plumbing and various fittings.  There are several thread patterns used in household settings, a few of which come into play for this project.  Most toilet water lines have 3/8″ OD (outside diameter) compression fittings.  Your standard kitchen sprayer connects with 1/4″ FIP (Female Iron Pipe Thread).  Most toilet connections are either 1/2″ or 7/8″ MIP (Male Iron Pipe Thread).  The tricky part to hooking up a diaper sprayer is trying to get these thread patterns to work together with the fewest adaptors. [NOTE: You don’t need to remember all of this, but it is helpful to know when talking to an associate at a hardware store.]

Parts

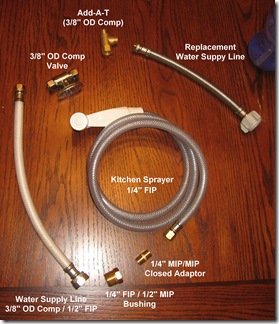
Here is a list of parts I used to complete the project along with their approximate prices:

  • Standard Kitchen Sprayer with 1/4″ FIP connection – $7
  • 1/4″ MIP Closed Adaptor (converts FIP to MIP) – $2
  • 1/4″ FIP > 1/2″ MIP reducer (also called a bushing) – $2
  • Standard water supply line – 3/8″ OD Compression > 1/2″ FIP (easiest and cheapest way I have found to convert standard thread to compression connections) – $4
  • Add-A-Tee 3/8″ OD Compression (Allows you to add a second supply line to your existing toilet valve without having to shut off the water main) – $6
  • Water Supply Valve (3/8″ OD Compression input and outlet.  This may be omitted) – $8
  • Replacement Water Supply Line (match to your current toilet configuration.  May be omitted if old supply line works with new setup) – $4
  • Teflon Tape (for non-compression fittings) – $1

Parts

Parts for the most basic set up should cost just a bit over $20.  I was able to pick up all these parts at my local Lowes (I generally prefer Home Depot, but found for plumbing accessories Lowes has a better selection). The final bill for the setup described here was roughly $32.

NOTE: If these parts are not available, you may have to improvise.  If that’s the case it very helpful to know the specific thread conversions you are trying to achieve (see details above).

Installation

  1. Begin by shutting off the toilet water valve, draining the toilet, and removing the old water supply line (keep this handy in case you can reuse it or for reference if you replace it).  You may want a bucket to catch any water draining from the tank.
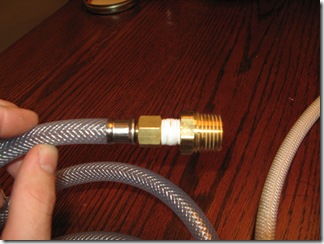
  2. Connect the adaptor and reducer (bushing) to the kitchen sprayer.  You will want to put Teflon tape around the threads to prevent leaks.
    2010-03-16 Tally 005
  3. Next connect the water supply line to the 1/2″ reducer you just installed.  Again, you will want to use Teflon tape for this one.
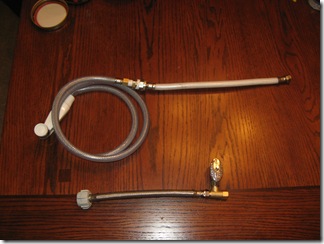
  4. Attach the 3/8″ compression valve to the Add-a-Tee adaptor as well as the water supply line you will be using for your toilet to the  (you shouldn’t need to use Teflon tape for this).
    2010-03-16 Tally 008
  5. At this point you should be able to connect everything else up.  Connect the sprayer assembly to the valve and then connect the whole apparatus to your toilet water valve and the toilet.

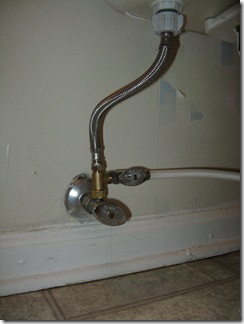
Your final setup should look something like this:

2010-03-16 Tally 009

Options

Depending on your setup, your access to plumbing supplies and your skill level, there are a few modifications you could try:

  • Omit the extra valve and simply use the main water supply valve to moderate pressure.  This is how we did the first set up.  It works well and saves quite a bit of money since the valve is by far the most expensive part.  Your options then are either a slow filling toilet or a super powerful sprayer.
  • Instead of messing with the closed adaptor, bushing & water supply line, you could cut off the old 1/4″ FIP connector and affix a compression fitting.
  • If you have easy access to the main water line, it may be easier to swap the valve out for one with two connectors.  Some valves have both compression and standard MIP connections.
  • You can use different fitting combinations to achieve the same result.  For instance, it may be cheaper to use a 1/2″ valve instead of a 3/8″ compression valve to moderate your water flow.  Likewise, you may be able to go straight from 1/4″ FIP to 3/8″ compression without using the extra fittings.

——

I am by no means a plumber, but I found the following procedure relatively simple and only needed an adjustable wrench to complete the project.  The hardest part was figuring out which thread patterns I had and which parts I would need.

After I had wrapped up the install and was writing this blog entry I came across a post which outlines a similar procedure.  Perhaps it will be helpful for you.  Doing this project yourself will not save you a whole lot of money (probably $10-15) but you will have the satisfaction knowing you can make your own diaper sprayer.