Do It Yourself Diaper Sprayer
Beth and I have been very pleased with our decision to use cloth diapers. Besides the washing every couple days, the only thing that really requires more effort than disposables is the need to clean the #2 off of diapers. You can splash them around in the toilet, but most people prefer to use a diaper sprayer.
You can purchase these from a variety of places (see here, here and here). These generally run about $40. However, if you are up for it, you can build your own homemade diaper sprayer for $25-30 in less than 30 minutes. Below you will find instructions and a parts list for the method I have used for two installs.
Before you begin, you need to know a bit about basic plumbing and various fittings. There are several thread patterns used in household settings, a few of which come into play for this project. Most toilet water lines have 3/8″ OD (outside diameter) compression fittings. Your standard kitchen sprayer connects with 1/4″ FIP (Female Iron Pipe Thread). Most toilet connections are either 1/2″ or 7/8″ MIP (Male Iron Pipe Thread). The tricky part to hooking up a diaper sprayer is trying to get these thread patterns to work together with the fewest adaptors. [NOTE: You don’t need to remember all of this, but it is helpful to know when talking to an associate at a hardware store.]
Parts
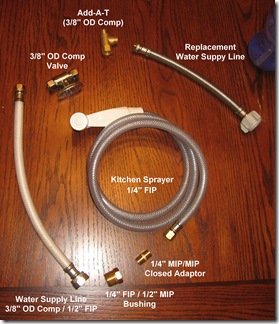
Here is a list of parts I used to complete the project along with their approximate prices:
- Standard Kitchen Sprayer with 1/4″ FIP connection – $7
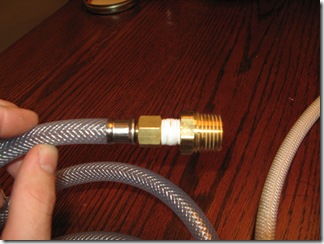
- 1/4″ MIP Closed Adaptor (converts FIP to MIP) – $2
- 1/4″ FIP > 1/2″ MIP reducer (also called a bushing) – $2
- Standard water supply line – 3/8″ OD Compression > 1/2″ FIP (easiest and cheapest way I have found to convert standard thread to compression connections) – $4
- Add-A-Tee 3/8″ OD Compression (Allows you to add a second supply line to your existing toilet valve without having to shut off the water main) – $6
- Water Supply Valve (3/8″ OD Compression input and outlet. This may be omitted) – $8
- Replacement Water Supply Line (match to your current toilet configuration. May be omitted if old supply line works with new setup) – $4
- Teflon Tape (for non-compression fittings) – $1
Parts for the most basic set up should cost just a bit over $20. I was able to pick up all these parts at my local Lowes (I generally prefer Home Depot, but found for plumbing accessories Lowes has a better selection). The final bill for the setup described here was roughly $32.
NOTE: If these parts are not available, you may have to improvise. If that’s the case it very helpful to know the specific thread conversions you are trying to achieve (see details above).
Installation
- Begin by shutting off the toilet water valve, draining the toilet, and removing the old water supply line (keep this handy in case you can reuse it or for reference if you replace it). You may want a bucket to catch any water draining from the tank.
- Connect the adaptor and reducer (bushing) to the kitchen sprayer. You will want to put Teflon tape around the threads to prevent leaks.

- Next connect the water supply line to the 1/2″ reducer you just installed. Again, you will want to use Teflon tape for this one.
- Attach the 3/8″ compression valve to the Add-a-Tee adaptor as well as the water supply line you will be using for your toilet to the (you shouldn’t need to use Teflon tape for this).

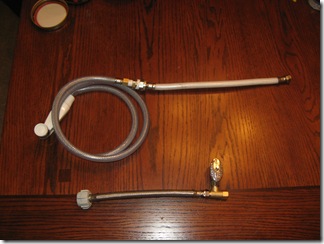
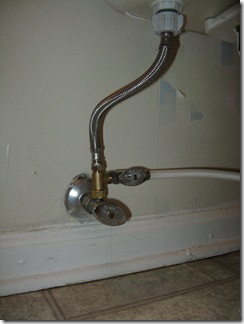
- At this point you should be able to connect everything else up. Connect the sprayer assembly to the valve and then connect the whole apparatus to your toilet water valve and the toilet.
Your final setup should look something like this:
Options
Depending on your setup, your access to plumbing supplies and your skill level, there are a few modifications you could try:
- Omit the extra valve and simply use the main water supply valve to moderate pressure. This is how we did the first set up. It works well and saves quite a bit of money since the valve is by far the most expensive part. Your options then are either a slow filling toilet or a super powerful sprayer.
- Instead of messing with the closed adaptor, bushing & water supply line, you could cut off the old 1/4″ FIP connector and affix a compression fitting.
- If you have easy access to the main water line, it may be easier to swap the valve out for one with two connectors. Some valves have both compression and standard MIP connections.
- You can use different fitting combinations to achieve the same result. For instance, it may be cheaper to use a 1/2″ valve instead of a 3/8″ compression valve to moderate your water flow. Likewise, you may be able to go straight from 1/4″ FIP to 3/8″ compression without using the extra fittings.
——
I am by no means a plumber, but I found the following procedure relatively simple and only needed an adjustable wrench to complete the project. The hardest part was figuring out which thread patterns I had and which parts I would need.
After I had wrapped up the install and was writing this blog entry I came across a post which outlines a similar procedure. Perhaps it will be helpful for you. Doing this project yourself will not save you a whole lot of money (probably $10-15) but you will have the satisfaction knowing you can make your own diaper sprayer.


So, if I understand correctly, your extra valve is 3/8″ OD Compression female fitting on one side and male on the other? Otherwise, does your Add-A-Tee have a male and a female?
Thanks for the question.
Most household toilet valves (what is coming out of the wall) are male 3/8 OD compression. The Add-a-T has has one female and two male hook-ups (all 3/8 OD Compression). It basically takes that standard outlet and splits it into two identical outlets. The valve I added does in fact have one male and one female outlet (again all 3/8 OD Compression). With those two fittings, basically what I have is an extra toilet hookup just like my original, but this time with an extra valve to control flow.
The other place it would have been easy to add a valve would have been at the 1/2″ 1/4″ junction, but the valves I found were brass and bulky and didn’t look as nice.
If you have access to your home water supply and the plumbing skills to pull it off, you can save some money by simply replacing the valve at the wall. They make double valves in a variety of sizes that can simplify your process.
Thanks for the info. I just wanted clarification because I couldn’t find the right kind of valve at Home Depot. I ended up getting most of my supplies at Lowe’s because the selection was just so much better there.
I essentially replicated your setup. The only thing I wish is that I didn’t have to reach back behind the toilet to get at the second valve, so maybe in some ways it would make more sense to have the valve at the 1/2″ to 1/4″ junction like you said. Or even perhaps getting a longer line (I know they make 20″ supply lines, and likely even longer) and seeing about somehow mounting the valve to the wall, perhaps close to the height of the flushing handle on the toilet. Ultimately, not necessary, but certainly a convenience factor.
All in all, though, pretty simple project and process once you get all the right parts, which I didn’t do at first. I ended up with four or five separate trips to Home Depot and Lowe’s, but after all was said and done, I was able to successfully locate what I needed.
My recommendation to anyone else trying this: Print or write down a list of all the requisite parts before making your trip to the store, unlike myself. You’ll end up getting confused, forgetting something here or there, or worst of all getting “assistance” from a “specialist” working in the store who has all kinds of suggestions that end up proving fruitless. (In all honesty, the guy at Home Depot was extremely friendly and was trying to be helpful, but really just unintentionally complicated things for me.)
Other suggestion: If you get a second valve, see if you can get a quarter turn or anything that isn’t a multi-turn valve. This is simply because you’re most likely going to be bending over at the toilet reaching down near to the floor on the wall behind the toilet. Cranking that thing a multitude of times will become a bit of a burden. If you can simply flip to the “on” or “off” position with a quick turn, you’ll end up avoiding something that could end up becoming burdensome as opposed to what it was originally supposed to be: a convenience.
Thanks for sharing your experience.
I generally prefer going to Home Depot, but I ran into the same issues you did and ended up going to Lowes both times (I did this project once in Kentucky and once in Florida and ended up with the same results).
In regards to your comments about the valve placement, all I can say is that it has not affected us. But we do not use the valve as a on/off switch but rather as a flow reducer.
Thank you for the how to…be putting one in this weekend. Have a 100 year old house so hope it goes in smooth 🙂
These kits have come down in price:
http://blankcdmedia.com/bath 26 bucks.
Thanks for posting this. If I knew about this, I would have purchased this model instead of going through building my own. Great prices!
Do you think the water pressure is as good from this sprayer as the one in the kitchen? My kitchen sprayer has amazing pressure, but my diaper sprayer does not. I am not sure if this is a problem with the sprayer, or the way we have the water hooked up to it? What do you think?
We had too much water pressure coming from the pipe so we had to install the valve. Of course your experience may vary.
The only hard-to-find part in this list is the shut-off valve with a female 3/8″ OD inlet. Most either have 3/8″ FIP, or 3/8″ OD compression; neither of those will connect to the add-a-tee’s 3/8″ OD compression outlet. The local plumber supply had a quarter-stop valve with 1/2″ FIP inlet, and an adapter that had 1/2″ MIP going to a 3/8″ OD compression _female_ end. That adapter is what you won’t find at home depot or Lowe’s.
@Reezwan
Yeah but once it breaks you have to buy entire kit and spend another $26. I have been buying these cheaply made kits for 5 or 6 years and they needed to replaced every year since they are designed to break in order for you to keep buying them over and over again. I was tired of that and decided to build my own using a kitchen sink sprayer and its been great. Worst case scenario if the sprayer breaks just get another sprayer and you don’t have to worry about spending your time and money on installing the whole assembly. Now I am going to install another handheld bidet in second toilet but I forgot what exactly I need to carryout this task, so thanks to this blog and few other sites now I know exactly what to get.
In case anyone is curious, removing this from one toilet and installing it on another is about the easier thing ever.
Hey, I am in the process of doing this. I bought everything, everything appears to be the right size except I can’t get the 3/8″x3/8″ tee to fit back to the valve because it requires a “flare cap.’ Is there a tee valve with a flare cap? If that question even makes sense. Thanks.
@Quentin McCart The “flare cap” you are referring to is the 3/8″ OD Compression fitting. Normally this is what is coming off the wall. What you need is an add-a-tee that takes one 3/8 OD Comp and turns it into two. That allows you to then connect two toilet water supply lines — one that goes to your tank and another that you connect to the sprayer. If you want to adjust the power of the sprayer, you will need a 3/8 OD Comp Male > 3/8 OD Comp Female value or find a valve you can insert after the water supply line on the FIP/MIP connections.
I know that is a bit technical, but hopefully it helps.