Things I have become

May 2nd, 2010 No comments

A few days ago while reflecting on my daughter’s first birthday I wrote about things that at one time described me, but no longer apply.  I wanted to flip that around and identify the things I have recently become.  The last five years have been particularly transitional (and our future plans will only serve to continue that).

Just like the last list, these descriptors are varied.  Some are the result of philosophical/theological shifts, some reflect major life transitions, and others have slowly developed based on changing life circumstances.

Here are things that I have become:

  • A gardener
  • A grant-writer
  • A pacifist
  • A stay-at-home dad
  • A distiller
  • A father
  • Less goals-oriented
  • A master of biblical studies (I even have a degree that says so)
  • A polyglot (although my skills are fading)
  • More progressive
  • More free
  • A whiskey expert
  • A better cook
  • Theologically liberal
  • Post-modern
  • A blogger
  • Balding
  • More appreciative of fine food and drink
  • Domesticated
  • Completely intolerant… of racism and bigotry
  • More aware of my flaws

Mikayla’s first year in pictures

April 28th, 2010 1 comment

week 39 005

Mikayla 010

_MG_0289_ed

Mikayla Month of May 028

grad june 052

2009-07-04 Kickert and Simmons visit 042

2009-07-22 Pouty Face 032

2009-07-30 Late June 095

2009-08 August 014

2009-08-23 August 092

2009-09-03 Jackson's Orchard 032

2009-10-06 Camry 009

2009-October and November 177 

IMG_9623_ed

2009-12-05 Thanksgiving, tree, bacon 004

2009-12-09 Christmas pictures 030

2009-12-25 Christmas 172

2010-January 024

2010-January 084

2010-January-100th day 073 

2010-February 018

2010-02-26 Olympics, February random 104

2010-03-16 Tally 057

2010-03-25 Bike, food, walker 033

2010-03-30 Spring has sprung 017

April 1 2010 - Cicis and dress 028

2010-04-08 Visits (BG and E-Town) 022

2010-04-10 Mammoth Cave 056

1 year 012

Categories: Family Tags: , , ,

Things I no longer am

April 27th, 2010 2 comments

With my daughter turning 1 tomorrow, I have been mulling over ways my life has changed recently.  It got me thinking about the things that at some point in my life served to define me, but no longer apply.  Some of these represent transitions in life, others reflect philosophical shifts, and others are simply changes (formal and informal) brought about by time.  Some of these I lament and others I am glad to have shed.

Here is a list (in no particular order) of things I no longer am:

  • A student
  • A firefighter
  • Single
  • A Saturday-morning-sleeper-inner
  • An evangelical
  • A minister
  • 165 pounds
  • 205 pounds
  • A bicycle mechanic
  • A full-time employee
  • An abstainer (I am married after all)
  • A San Fransico 49ers fan
  • A beleiver in a literal hell
  • A regular backpacker / mountain biker / rock climber
  • A person with a full head of hair
  • Anti-cell phone
  • Motivated by upward mobility
  • Childless
  • A night owl
  • Oblivious to world news
  • A critic of homosexual Christians
  • Ignorant to fine wines and spirits
  • A fiction reader
Categories: Family, Random Tags: , , ,

Trail Review: Mammoth Cave – First Creek Lake

April 12th, 2010 No comments

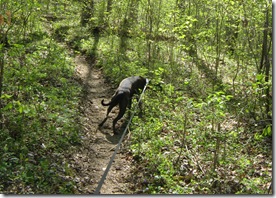
Sunday was the perfect day to be outside.  The sky was deep blue, the temperature was just right and the trees and wildflowers were in bloom.  We decided to take advantage of it by hiking in Mammoth Cave with the whole family (dog included).

2010-04-10 Mammoth Cave 028 2010-04-10 Mammoth Cave 039

We wanted to stay away from the touristy areas since it was such a beautiful spring weekend so we decided to hike in the west side of the park to Mammoth Cave’s largest above ground body of water: First Creek Lake.    The route we chose began at the Temple Hill trailhead and then included the loop around the lake before heading out the way we came.  Since we were hiking with our 1 year old, we thought it would be a bit much to attempt the longer route coming in from from the First Creek trailhead, plus this gave us a few options if we needed an even shorter trip.

We came in through the Brownsville entrance and took the Houchins Ferry across the Green River (Check here for ferry hours).  The road is gravel and well maintained.  There is parking at the trailhead, but it is not well laid out

2010-04-10 Mammoth Cave 022Beth and Mikayla at the Trail Head

The hike begins with a 1.9 mile segment that follows the ridge heading down to the Nolin River [NOTE: This trail has been recently rerouted.  Old topo maps do not reflect the change.  See links below.] The trail is well maintained, and even though horses are allowed on this section, degradation is minimal.  Overall the slope is moderate, but there are two sections that are relatively steep as you drop down off the ridge and then down onto the flood plain.  The trail provides good views of the river valley.

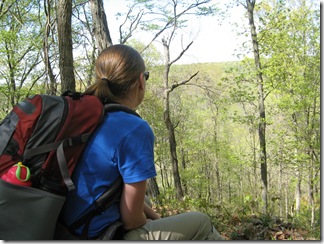
2010-04-10 Mammoth Cave 052Beth looking across the valley before dropping down the ridge

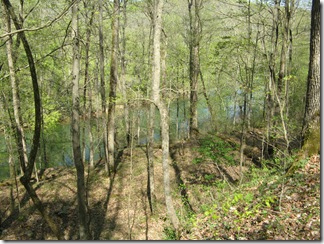
2010-04-10 Mammoth Cave 050Looking down towards the Nolin River

Once you reach the base of the lake, you can choose which route to take.  The left (west) option is shorter (for through hikers) and flatter.  It passes campsite #1 and a spur trail down to Nolin Lake.  The right option follows the base of the ridge, passes campsite #2 and crosses the two creeks which feed the lake.  If you do the entire loop it is 1.3 miles.  The longer option (ridge route) is 1.0 miles to the junction while the shorter option is 0.3 miles.  We took the left (west) segment first so if we needed to double back to shorten things we could.

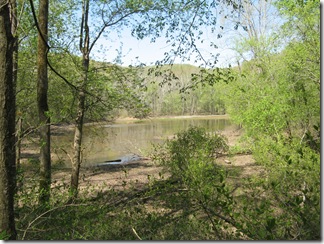
Overall we were a bit disappointed with the destination.  Despite spring rains, the lake was quite low and marshy.  Even then, it was only visible for about 10% of the loop.  The spur trail to the river was narrow as it followed a deep muddy trench where the lake drains.  Once at the river, the options were minimal.  There is little shade and even less flat ground.  There is a fire pit near the river, but when we got there it was filled with trash.

2010-04-10 Mammoth Cave 046View of First Creek “Lake” from campsite #2

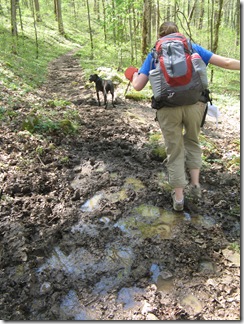
We continued on the short leg of the loop hoping to find another option for eating lunch along the river, but didn’t find anything.  Compared with the trail down, the loop is in much worse condition showing many muddy sections which have been chewed up by horse tracks.  The longer segment of the loop is much worse with several extended sections of muddy pot holes.  In relation to the whole trail, 90% was in great condition; but, the remaining 10% could be very unpleasant.

2010-04-10 Mammoth Cave 045One of the not-so-good sections

Despite the mud on the trail, the creek beds along the longer segment were quite dry.  Although, based on the debris, it was apparent there could be significant flow at times,

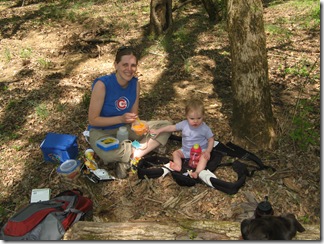
We ended up stopping for lunch just off the trail.  We found a shady spot on the dried northeast section of the lake bed.  At the time it was very pleasant, but I could imagine the bugs would be quite annoying later in the season.

2010-04-10 Mammoth Cave 024Lunch along the trail

Campsite #2 is just a few hundred feet from the south trail junction.  It my opinion, it is the better of the two sites.  It does not have the easy access to the river, but it does have a better view of the lake and seems to be more secluded.

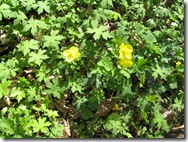
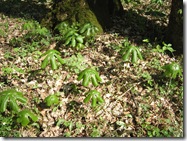
On the way back out we noticed the blooming wildflowers much more (that is probably because we were going much slower as we hiked up instead of down).  There were plenty of may apples already sprouting up and several other flowers poking through last year’s leaves.

2010-04-10 Mammoth Cave 047 2010-04-10 Mammoth Cave 043 2010-04-10 Mammoth Cave 044
Plants and flowers along the way

Overall we had a great time and enjoyed the hike but I would not consider the lake to be a destination in and of itself.  It was not a difficult hike, but it was not super easy either.  You don’t have to be in great shape to do it, but you wouldn’t want to take a small child and expect them to walk it all on their own.  It took us about 3 hours to complete the trip at a leisurely pace.  While I have not hiked it, I have heard the north section of the First Creek trail is pretty tore up from the horse traffic.  Something to consider if you are planning a trip of your own.

At a Glance:

Mammoth Cave – First Creek Lake
Type: Point-to-point with loop
Length: 5.1 miles
Rating: Enjoyable
Difficulty: Moderate

Date: April 10, 2010
Weather: 77 and sunny
Duration: 3 hours

Helpful Links:

Work Around the Garage

March 30th, 2010 No comments

2010-03-30 Spring has sprung 045

I wouldn’t consider myself to be especially handy.  I can change my own oil, and know how to run a few power tools.  But, these are not indications of how handy I am, but rather point out just how cheap I am.  I refuse to take my car to the shop if it something I think I can figure out on my own (and after 10+ hours, with plenty of busted knuckles, I either get it figured out, or I have screwed it up so bad that I have no choice but to take it in).

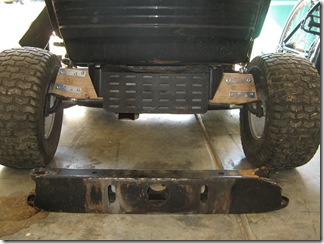
Case in point: I broke the steering arm on my riding lawn mower, which effectively meant my wheels were falling off and I could only change directions by kicking the tires while they were moving.  Did I take it to the shop to get fixed?  No.  Did I get someone to weld me a new support arm? No.  Instead, I decided to fashion a replacement out a 2×4, metal brackets, cut washers and .some furniture sliders.
2010-03-30 Spring has sprung 032

After a few adjustment, it works like a charm.  Now lets just see if I can get it to last through the summer.

Suspended Shelving and Fold-down Workbench

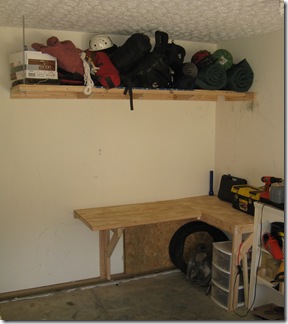
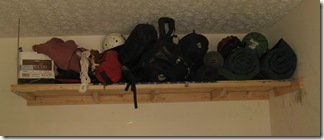
My most recent project has involved building some shelving and a work bench in the garage.  I needed to be able to get our outdoor gear out of the way, store my tools and have a workbench to complete projects on (the top of the deep freeze just wasn’t cutting it anymore.)

The first piece I completed was the suspended shelving.  I knew I wanted to build it out of plywood and 2x4s (for easy of construction and cost) and I did not want to have massive supports jutting out.  So I came up with a design that utilizes 2×4 cleats screwed to the studs and then a 3/8" threaded rod supporting one corner
2010-03-30 Spring has sprung 034

I started by marking the height I wanted the shelf and then screwing in two perpendicular 2x4s.  For my garage, it made sense to hang the shelf 48" from the ceiling.  [NOTE: I should have attached the shorter cleat first to maximize the number of studs it could screw in to.]

I then constructed the shelf itself.  I screwed 2x4s along two sides of 1/4" (2′ x 8′) plywood.  [NOTE: Be sure to leave room for the cleats you previously installed.  I forgot to do this on the short side and had to notch the cleat.]  With someone’s help, hoist the shelf up onto the cleats.  One or two strategic screws should hold it in place while you complete the project.  I waited to install the final screws until I had the rod installed to help support the weight.

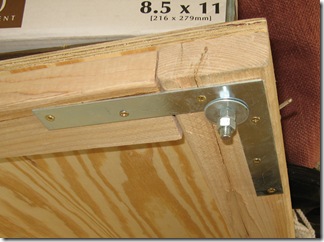
Next I installed a 90 degree bracket to help hold things together and to spread the weight distribution.  By drilling a hole through the apex and using a large washer, I was able to provide a good support for the connecting rod.
2010-03-30 Spring has sprung 043

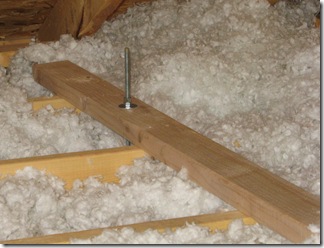
I passed the threaded rod through this support and secured it with a large washer and two bolts.  I left roughly six inches below the bolts in case I needed to adjust things.  The rod then passed through the drywall in the ceiling where it was secured to a 2×4 passing over multiple joists.
2010-03-30 Spring has sprung 042

Besides being less obtrusive, the main advantage to using a threaded rod to support the shelf is that you can adjust it after installation.  Once the rod was secured on both ends, I was able to use the bolts to ensure everything was perfectly level.  I then cut off the excess bolt.

The only thing remaining to complete the project was to include supports.  I added 3 by tapering a 2×4 down to 1.5" and securing from the top.  These were then affixed to the cleat.  [NOTE: If I had planned ahead, I could have attached these to the cleat before I installed it and it would have resulted in a much more stable design.]

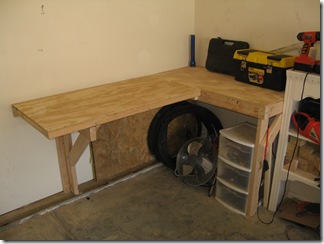
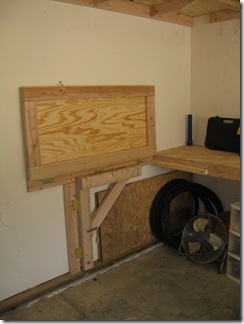
Once I had the suspended shelving complete (and the resulting clutter out of the way), I could turn my attention to building a work bench.  One thing I had to consider was the depth of my garage.  Because things can get cramped, I wanted to be able to have get the workbench out of the way if I needed to.  I decided on a two part design with a permanent section and a folding section.  I built the surface out of the other half of the plywood from the shelving project.
2010-03-30 Spring has sprung 033

The permanent section was relatively straightforward.  I built a one-legged frame out of 2×4’s and then attached it to the studs in the wall.  I used brackets to attach the support to the leg.  I then screwed the work surface onto the frame (there is a center support to help distribute weight that is built into the frame).

The drop-down section took a bit more thinking.  I began by attaching a 2×4 cleat flush with the permanent section of the workbench.  Then, along the furthest-most stud, I attached a perpendicular 2×4 to anchor a hinged support.

I built the drop down section out of the remaining plywood with a 2×4 frame.  This time I did not use center supports because the whole section is not designed to support a lot of weight.

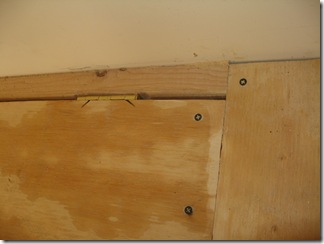
I used heavy duty door hinges to support the whole apparatus.  I notched the support cleat as well as the work surface so that it could remain flush with the other work bench. 
2010-03-30 Spring has sprung 049

The hardest part was trying to align the hinges when attaching the workbench to the wall.  To do this, I attached a 2×2 on the permanent section to help support things then held the fold away bench against the cleat while trying to get it level.  I had someone else go under the bench and mark where the bottom of the hinges were.  I then took a spare hinge and used it as a guide to pre-dill the holes.  From there it was relatively easy to screw the hinges into place. 

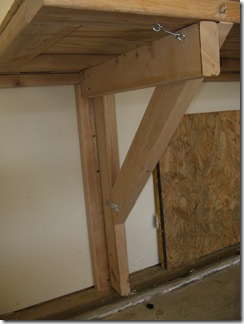
The hinges were strong enough to support the workbench temporarily, but I needed to build something more sturdy.  For that, I used the same style hinges and fashioned a simple support out of 2x4s that secured into place with a basic latch.
2010-03-30 Spring has sprung 038

When not it use, the support and table top can fold flat against the wall.  I used another latch to secure it in the up position.
2010-03-30 Spring has sprung 039

The whole project took about $60 in materials and 10 hours in labor.  I probably could have done it much less time if my miter saw had been working and I had thought through my final design a bit more.

If I value my time at even minimum wage, I doubt I saved much.  But, just like with the home made diaper sprayer we installed, there is just something rewarding about completing a project on your own.

Mikayla takes her first steps

March 17th, 2010 2 comments

These are actually Mikayla’s second steps. She stumbled once on her own, then we stood her up and she took 3-4 steps. Beth and I went nuts. We were able to catch her second attempt on camera.

If you look closely on the left edge of the video you can see me jumping up and down in excitement.

Categories: Family Tags: , , ,

2010 NCAA Tournament Picks

March 17th, 2010 3 comments

Here are my NCAA Tournament picks for this year:

Categories: Events, Random Tags: , ,

Do It Yourself Diaper Sprayer

March 16th, 2010 14 comments

Beth and I have been very pleased with our decision to use cloth diapers.  Besides the washing every couple days, the only thing that really requires more effort than disposables is the need to clean the #2 off of diapers.  You can splash them around in the toilet, but most people prefer to use a diaper sprayer.

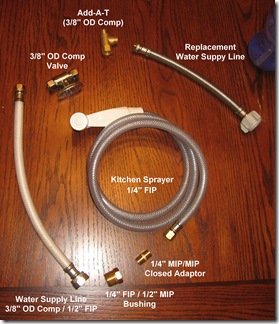
You can purchase these from a variety of places (see here, here and here).  These generally run about $40.  However, if you are up for it, you can build your own homemade diaper sprayer for $25-30 in less than 30 minutes. Below you will find instructions and a parts list for the method I have used for two installs.

Before you begin, you need to know a bit about basic plumbing and various fittings.  There are several thread patterns used in household settings, a few of which come into play for this project.  Most toilet water lines have 3/8″ OD (outside diameter) compression fittings.  Your standard kitchen sprayer connects with 1/4″ FIP (Female Iron Pipe Thread).  Most toilet connections are either 1/2″ or 7/8″ MIP (Male Iron Pipe Thread).  The tricky part to hooking up a diaper sprayer is trying to get these thread patterns to work together with the fewest adaptors. [NOTE: You don’t need to remember all of this, but it is helpful to know when talking to an associate at a hardware store.]

Parts

Here is a list of parts I used to complete the project along with their approximate prices:

  • Standard Kitchen Sprayer with 1/4″ FIP connection – $7
  • 1/4″ MIP Closed Adaptor (converts FIP to MIP) – $2
  • 1/4″ FIP > 1/2″ MIP reducer (also called a bushing) – $2
  • Standard water supply line – 3/8″ OD Compression > 1/2″ FIP (easiest and cheapest way I have found to convert standard thread to compression connections) – $4
  • Add-A-Tee 3/8″ OD Compression (Allows you to add a second supply line to your existing toilet valve without having to shut off the water main) – $6
  • Water Supply Valve (3/8″ OD Compression input and outlet.  This may be omitted) – $8
  • Replacement Water Supply Line (match to your current toilet configuration.  May be omitted if old supply line works with new setup) – $4
  • Teflon Tape (for non-compression fittings) – $1

Parts

Parts for the most basic set up should cost just a bit over $20.  I was able to pick up all these parts at my local Lowes (I generally prefer Home Depot, but found for plumbing accessories Lowes has a better selection). The final bill for the setup described here was roughly $32.

NOTE: If these parts are not available, you may have to improvise.  If that’s the case it very helpful to know the specific thread conversions you are trying to achieve (see details above).

Installation

  1. Begin by shutting off the toilet water valve, draining the toilet, and removing the old water supply line (keep this handy in case you can reuse it or for reference if you replace it).  You may want a bucket to catch any water draining from the tank.
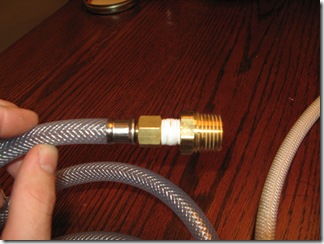
  2. Connect the adaptor and reducer (bushing) to the kitchen sprayer.  You will want to put Teflon tape around the threads to prevent leaks.
    2010-03-16 Tally 005
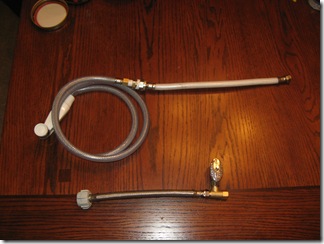
  3. Next connect the water supply line to the 1/2″ reducer you just installed.  Again, you will want to use Teflon tape for this one.
  4. Attach the 3/8″ compression valve to the Add-a-Tee adaptor as well as the water supply line you will be using for your toilet to the  (you shouldn’t need to use Teflon tape for this).
    2010-03-16 Tally 008
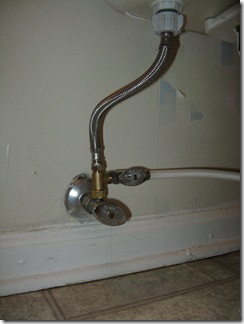
  5. At this point you should be able to connect everything else up.  Connect the sprayer assembly to the valve and then connect the whole apparatus to your toilet water valve and the toilet.

Your final setup should look something like this:

2010-03-16 Tally 009

Options

Depending on your setup, your access to plumbing supplies and your skill level, there are a few modifications you could try:

  • Omit the extra valve and simply use the main water supply valve to moderate pressure.  This is how we did the first set up.  It works well and saves quite a bit of money since the valve is by far the most expensive part.  Your options then are either a slow filling toilet or a super powerful sprayer.
  • Instead of messing with the closed adaptor, bushing & water supply line, you could cut off the old 1/4″ FIP connector and affix a compression fitting.
  • If you have easy access to the main water line, it may be easier to swap the valve out for one with two connectors.  Some valves have both compression and standard MIP connections.
  • You can use different fitting combinations to achieve the same result.  For instance, it may be cheaper to use a 1/2″ valve instead of a 3/8″ compression valve to moderate your water flow.  Likewise, you may be able to go straight from 1/4″ FIP to 3/8″ compression without using the extra fittings.

——

I am by no means a plumber, but I found the following procedure relatively simple and only needed an adjustable wrench to complete the project.  The hardest part was figuring out which thread patterns I had and which parts I would need.

After I had wrapped up the install and was writing this blog entry I came across a post which outlines a similar procedure.  Perhaps it will be helpful for you.  Doing this project yourself will not save you a whole lot of money (probably $10-15) but you will have the satisfaction knowing you can make your own diaper sprayer.

Of Authenticity and Friendship

March 16th, 2010 2 comments

no plans, left-overs for dinner, pajamas until noon, marathon board game sessions, 6 hours of Lonsome Dove, dirty diapers, cooking and washing dishes, minor plumbing work, disc golf…

This is how Beth and I spent last weekend.  Pretty mundane and typical.  At first glance seems no different than most free weekends we have.  But, last weekend was incredible as we spent it in Tallahassee with two of our closest and oldest friends Catherine and Dave* and our daughters.

Catherine, Beth, Molly and Mikayla

Switch...

What was so incredible about the weekend is just how ordinary it was.  There was no evidence of the 5 months that had elapsed since we were last together.  There were no expectations and there was not a need “to be doing something.”  Instead, we just hung out… exactly like we did in high school, and in college, and in our early married lives.

Everytime we get together, it always strikes me how natural things are.  In fact both this weekend and the last time we were together in the Smokies, I had a hard time finding pictures.  I think that’s because there has never been the feeling that what we were doing was “special” as much as it was just a regular weekend together.

Beth and I have many close friends, some of whom we have known for decades, but there is something special about our relationship with the Altmaiers as it epitomizes authenticity and friendship.

*Dave has “retired” his blog, but we are trying to encourage him to start it back.

Proud of my cousins

March 15th, 2010 No comments

We all like to help out worthy causes when we can.  Often that just requires a few bucks, or a text message, or volunteering a couple hours.  Don’t get me wrong, all those things matter, but when someone really gets behind something, and is willing to make true sacrafices, that is when amazing things happen.  Two of my Chicago cousins certainly fit into this later category.

A few weeks ago I received an email from cousin Amy about her participation with a St. Baldrick’s Foundation event.  Basically, participants shave their heads to raise money and awareness about cancer.  A few days later I received another email from my cousin Lauren saying she too was going to participate.

I consider myself a pretty bold person, but I have never been brave enough to shave my head… and I am a guy.  Here, my two FEMALE cousins are willing to shave theirs in solidarity and support of cancer research.  This is especially poignant considering our grandfather, who fought various types of cancer, passed away last year.

Beth and I are very proud of Lauren and Amy and wanted to share what they were doing.  We donated to both of them, and we want to encourage you to consider doing the same.  Here are their participant pages:

https://www.stbaldricks.org/participants/mypage/participantid/375041

https://www.stbaldricks.org/participants/laurens

Amy after shaving her head.