Do It Yourself Diaper Sprayer
Beth and I have been very pleased with our decision to use cloth diapers. Besides the washing every couple days, the only thing that really requires more effort than disposables is the need to clean the #2 off of diapers. You can splash them around in the toilet, but most people prefer to use a diaper sprayer.
You can purchase these from a variety of places (see here, here and here). These generally run about $40. However, if you are up for it, you can build your own homemade diaper sprayer for $25-30 in less than 30 minutes. Below you will find instructions and a parts list for the method I have used for two installs.
Before you begin, you need to know a bit about basic plumbing and various fittings. There are several thread patterns used in household settings, a few of which come into play for this project. Most toilet water lines have 3/8″ OD (outside diameter) compression fittings. Your standard kitchen sprayer connects with 1/4″ FIP (Female Iron Pipe Thread). Most toilet connections are either 1/2″ or 7/8″ MIP (Male Iron Pipe Thread). The tricky part to hooking up a diaper sprayer is trying to get these thread patterns to work together with the fewest adaptors. [NOTE: You don’t need to remember all of this, but it is helpful to know when talking to an associate at a hardware store.]
Parts
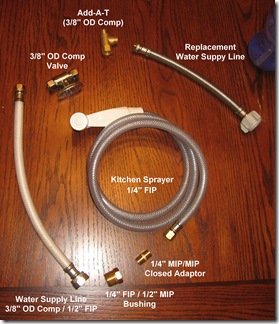
Here is a list of parts I used to complete the project along with their approximate prices:
- Standard Kitchen Sprayer with 1/4″ FIP connection – $7
- 1/4″ MIP Closed Adaptor (converts FIP to MIP) – $2
- 1/4″ FIP > 1/2″ MIP reducer (also called a bushing) – $2
- Standard water supply line – 3/8″ OD Compression > 1/2″ FIP (easiest and cheapest way I have found to convert standard thread to compression connections) – $4
- Add-A-Tee 3/8″ OD Compression (Allows you to add a second supply line to your existing toilet valve without having to shut off the water main) – $6
- Water Supply Valve (3/8″ OD Compression input and outlet. This may be omitted) – $8
- Replacement Water Supply Line (match to your current toilet configuration. May be omitted if old supply line works with new setup) – $4
- Teflon Tape (for non-compression fittings) – $1
Parts for the most basic set up should cost just a bit over $20. I was able to pick up all these parts at my local Lowes (I generally prefer Home Depot, but found for plumbing accessories Lowes has a better selection). The final bill for the setup described here was roughly $32.
NOTE: If these parts are not available, you may have to improvise. If that’s the case it very helpful to know the specific thread conversions you are trying to achieve (see details above).
Installation
- Begin by shutting off the toilet water valve, draining the toilet, and removing the old water supply line (keep this handy in case you can reuse it or for reference if you replace it). You may want a bucket to catch any water draining from the tank.
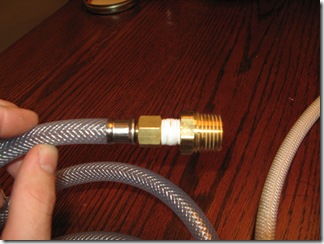
- Connect the adaptor and reducer (bushing) to the kitchen sprayer. You will want to put Teflon tape around the threads to prevent leaks.

- Next connect the water supply line to the 1/2″ reducer you just installed. Again, you will want to use Teflon tape for this one.
- Attach the 3/8″ compression valve to the Add-a-Tee adaptor as well as the water supply line you will be using for your toilet to the (you shouldn’t need to use Teflon tape for this).

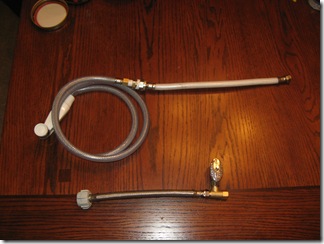
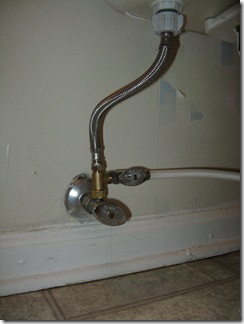
- At this point you should be able to connect everything else up. Connect the sprayer assembly to the valve and then connect the whole apparatus to your toilet water valve and the toilet.
Your final setup should look something like this:
Options
Depending on your setup, your access to plumbing supplies and your skill level, there are a few modifications you could try:
- Omit the extra valve and simply use the main water supply valve to moderate pressure. This is how we did the first set up. It works well and saves quite a bit of money since the valve is by far the most expensive part. Your options then are either a slow filling toilet or a super powerful sprayer.
- Instead of messing with the closed adaptor, bushing & water supply line, you could cut off the old 1/4″ FIP connector and affix a compression fitting.
- If you have easy access to the main water line, it may be easier to swap the valve out for one with two connectors. Some valves have both compression and standard MIP connections.
- You can use different fitting combinations to achieve the same result. For instance, it may be cheaper to use a 1/2″ valve instead of a 3/8″ compression valve to moderate your water flow. Likewise, you may be able to go straight from 1/4″ FIP to 3/8″ compression without using the extra fittings.
——
I am by no means a plumber, but I found the following procedure relatively simple and only needed an adjustable wrench to complete the project. The hardest part was figuring out which thread patterns I had and which parts I would need.
After I had wrapped up the install and was writing this blog entry I came across a post which outlines a similar procedure. Perhaps it will be helpful for you. Doing this project yourself will not save you a whole lot of money (probably $10-15) but you will have the satisfaction knowing you can make your own diaper sprayer.

