Archive

Posts Tagged ‘cloth diapers’

Do It Yourself Diaper Sprayer

March 16th, 2010 14 comments

Beth and I have been very pleased with our decision to use cloth diapers.  Besides the washing every couple days, the only thing that really requires more effort than disposables is the need to clean the #2 off of diapers.  You can splash them around in the toilet, but most people prefer to use a diaper sprayer.

You can purchase these from a variety of places (see here, here and here).  These generally run about $40.  However, if you are up for it, you can build your own homemade diaper sprayer for $25-30 in less than 30 minutes. Below you will find instructions and a parts list for the method I have used for two installs.

Before you begin, you need to know a bit about basic plumbing and various fittings.  There are several thread patterns used in household settings, a few of which come into play for this project.  Most toilet water lines have 3/8″ OD (outside diameter) compression fittings.  Your standard kitchen sprayer connects with 1/4″ FIP (Female Iron Pipe Thread).  Most toilet connections are either 1/2″ or 7/8″ MIP (Male Iron Pipe Thread).  The tricky part to hooking up a diaper sprayer is trying to get these thread patterns to work together with the fewest adaptors. [NOTE: You don’t need to remember all of this, but it is helpful to know when talking to an associate at a hardware store.]

Parts

Here is a list of parts I used to complete the project along with their approximate prices:

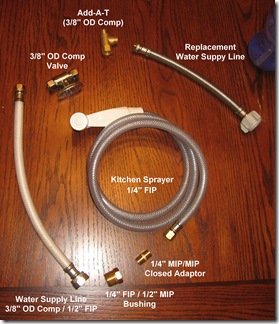
  • Standard Kitchen Sprayer with 1/4″ FIP connection – $7
  • 1/4″ MIP Closed Adaptor (converts FIP to MIP) – $2
  • 1/4″ FIP > 1/2″ MIP reducer (also called a bushing) – $2
  • Standard water supply line – 3/8″ OD Compression > 1/2″ FIP (easiest and cheapest way I have found to convert standard thread to compression connections) – $4
  • Add-A-Tee 3/8″ OD Compression (Allows you to add a second supply line to your existing toilet valve without having to shut off the water main) – $6
  • Water Supply Valve (3/8″ OD Compression input and outlet.  This may be omitted) – $8
  • Replacement Water Supply Line (match to your current toilet configuration.  May be omitted if old supply line works with new setup) – $4
  • Teflon Tape (for non-compression fittings) – $1

Parts

Parts for the most basic set up should cost just a bit over $20.  I was able to pick up all these parts at my local Lowes (I generally prefer Home Depot, but found for plumbing accessories Lowes has a better selection). The final bill for the setup described here was roughly $32.

NOTE: If these parts are not available, you may have to improvise.  If that’s the case it very helpful to know the specific thread conversions you are trying to achieve (see details above).

Installation

  1. Begin by shutting off the toilet water valve, draining the toilet, and removing the old water supply line (keep this handy in case you can reuse it or for reference if you replace it).  You may want a bucket to catch any water draining from the tank.
  2. Connect the adaptor and reducer (bushing) to the kitchen sprayer.  You will want to put Teflon tape around the threads to prevent leaks.
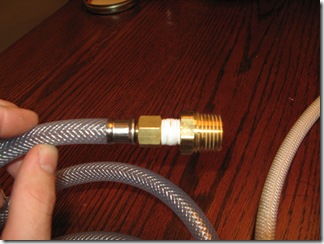
    2010-03-16 Tally 005
  3. Next connect the water supply line to the 1/2″ reducer you just installed.  Again, you will want to use Teflon tape for this one.
  4. Attach the 3/8″ compression valve to the Add-a-Tee adaptor as well as the water supply line you will be using for your toilet to the  (you shouldn’t need to use Teflon tape for this).
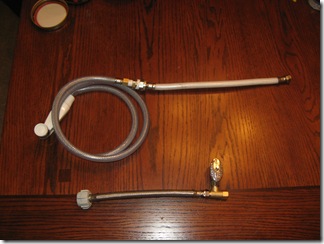
    2010-03-16 Tally 008
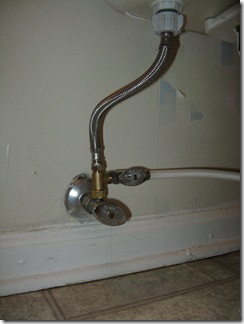
  5. At this point you should be able to connect everything else up.  Connect the sprayer assembly to the valve and then connect the whole apparatus to your toilet water valve and the toilet.

Your final setup should look something like this:

2010-03-16 Tally 009

Options

Depending on your setup, your access to plumbing supplies and your skill level, there are a few modifications you could try:

  • Omit the extra valve and simply use the main water supply valve to moderate pressure.  This is how we did the first set up.  It works well and saves quite a bit of money since the valve is by far the most expensive part.  Your options then are either a slow filling toilet or a super powerful sprayer.
  • Instead of messing with the closed adaptor, bushing & water supply line, you could cut off the old 1/4″ FIP connector and affix a compression fitting.
  • If you have easy access to the main water line, it may be easier to swap the valve out for one with two connectors.  Some valves have both compression and standard MIP connections.
  • You can use different fitting combinations to achieve the same result.  For instance, it may be cheaper to use a 1/2″ valve instead of a 3/8″ compression valve to moderate your water flow.  Likewise, you may be able to go straight from 1/4″ FIP to 3/8″ compression without using the extra fittings.

——

I am by no means a plumber, but I found the following procedure relatively simple and only needed an adjustable wrench to complete the project.  The hardest part was figuring out which thread patterns I had and which parts I would need.

After I had wrapped up the install and was writing this blog entry I came across a post which outlines a similar procedure.  Perhaps it will be helpful for you.  Doing this project yourself will not save you a whole lot of money (probably $10-15) but you will have the satisfaction knowing you can make your own diaper sprayer.
Not Your Daddy’s Diapers

June 21st, 2009 No comments

Seriously?  Your doing what?

That is the typical response Beth and I get when we inform people we are using cloth diapers.  There are varying levels of shock.  Some people think we are absolutely crazy, others are cool with it until we tell them we are not using “a service” but washing them ourselves.  Most people can appreciate the idea but insist it is not worth the effort.  At least half try to wager with us that we will stop using them within a month or so.  Very few are excited about it and open to cloth diapers as a mainstream option.

To the doubters, I must insist: you simply do not understand.

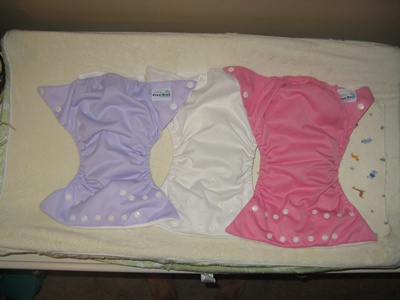
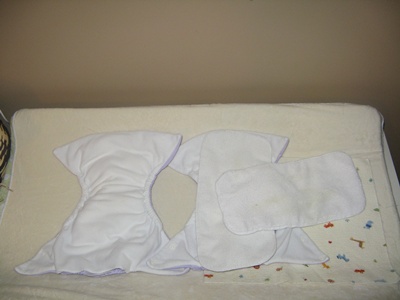
These are not the cloth diapers my generation was raised on (my parents started me on cloth, but abandoned early on).  Many people blindly assume that using cloth diapers involves rubber bloomers and safety pins.  While you can still do it like that, things have come a long way.  Beth and I use a brand called Fuzzi Bunz that are of a style known as pockets.  Basically they look like regular diapers.  They have a water proof shell, a fleece liner and a place where you can insert micro-terry pads.  Fuzzi Bunz use snaps and adjust to wide range of sizes (other pocket styles use velcro).  Putting the diapers on and taking them off is as easy as disposable.

Waterproof Shell in variety of colors

Waterproof Shell in variety of colors

Fleece Liner and Micro Terry Inserts

Fleece Liner and Micro Terry Inserts

What about cleaning them?

That is where admitedly it gets a bit more difficult than disposable.  You don’t just throw them away [TANGENT: this is actually the primary reason we went with cloth diapers, we could not stand the thought of throwing away 8-12 diapers a day for the next 2 years].  We do it this way:  Right after changing Mikayla, we take the daiper to the backroom, rinse the poo off in the toilet and then throw the diaper into a plastic 5 gallon bucket with lid and sprinkle a little baking soda every now and again.  At most it takes an additional minute to do this step.  When we are on the road, we carry a water proof bag with us and just rinse the diapers when we get home.  When we running low (we have 27 diapers now) we take the whole bag to the washing machine, dump it out, run it through a rinse cycle with cold water, and then wash Hot/cold with Purex Free and Clear.  We then pop the inserts in the dryer and let the shells air dry.  After they are dry it takes about 15 minutes to stuff the diapers (which I usualy do while watching TV).  We do about 2 loads a week.

Total additional time commitment: (1 minute extra changing time x 10 / day) + [(10 minutes to wash / dry + 15 minutes to stuff) x 2 / week) = 2 hours / week.

2 hours may seem like a lot, but when you think you spend 2-3 minutes per diaper change anyway, you are already looking at 2.5-3 hours/week on diapers, and if feedings take 20 minutes x 8 times per day you are looking at 18 hours/week with that.  Lets face it, babies take time, and the 2 hours you spend on clothe diapers are not productive minutes you are wasting, but idle minutes.  Compare that to the teenage years where every soccer game requires a two hour commitment of prime evening time!

What about cost?

Cloth diapers can be expensive.  Fuzzi Bunz are around $18 apiece.  BUT… we buy our diapers from a diaper exchange site called Daiper Swappers.  (Be careful… these “mommies” are intense – it takes about a week’s learning curve to understand the forum.)  and get them for between $5-10.  Yes they are used, but they still have plenty of life left in them.  To get us started it took about a $220 investment.  However, when you consider we will be able to sell those back and purchase the next size, we will be able to recoup most of our money.  If you shop around and are patient you can get good deals and then actualy sell them back for a profit.  That is what our friend Michelle does.  So when you consider it, we will basically get our diapers for free.  Compare that to my sister in law who spends $100/month on diapers for her two boys.  Even if you buy new, you are saving money. [NOTE: Fuzzi Bunz come in multiple sizes as well as an adjustable model that allows you to stay in one size for the whole time your baby is in diapers.  According to their website, most babies only use two sizes: S and M.  There are 4+ size options on each diaper and Mikayla is still on the smallest setting]

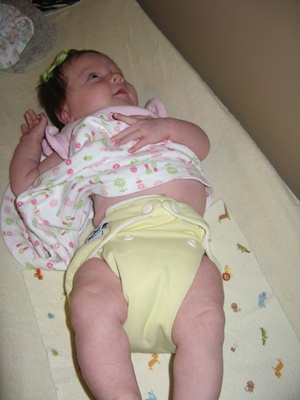
Mikayla in a fresh Fuzzi Bunz

Mikayla in a fresh Fuzzi Bunz

I am not saying cloth diapers are for everyone, but after doing our research and going through the process for 2 months, we are totally satisfied.  With Beth breastfeeding and us using cloth diapers, our monthly costs for Mikayla are close to zero.  To end, here are some pointers we have learned so far to:

  • Get a dry pail for home use. We picked up a 5 gallon bucket and lid for less than 5 dollars at Lowes.
  • Have at least two wet bags for traveling (3-4 would be better).
  • Since we bought used, our micro terry inserts have a variety of thicknesses.  We put the thicker ones in the colored diapers and the thinner ones in the white diapers.  That way it is easy to tell which have great absorbency when using them overnight, or for a long car ride. [Update: We ended buying more “doubler” inserts — basically thin inserts that can be added when you need extra absorbency — and making all of our diaper thicker”]
  • Take the time to understand the various styles.  Fuzzi Bunz are not the only type, but after comparing different brands, it was obvious this was the right match for us. (others are cheaper, but require more work; others use velcro which is easier to use, but can wear out faster).
  • Be prepared to change diapers a bit more frequently because there are no chemicals to instantly dry the liquid.
  • While you could make it with 10-12 diapers, it is well worth the extra money to get 20-30.  Not only do you only have to do wash every 3 days or so, but it saves water because you can do larger loads.
  • We still use disposables on occasion.  We have been using them at night simply because we were given so many at showers.  It is also nice to have them when traveling, but using a wet bag is not difficult or messy at all.
  • We haven’t had to do this yet, but the word on the street is that you can get rid of pesky stains by letting the diapers sit out in the sun.
  • Finally, don’t knock ’em until you have tried ’em.